Integrating CVS Version Control with Netbeans® 4.0 Java IDE
If you are here, you should have completed the introductory steps described in my original CVS-Netbeans® page. If not, go there now or risk being confused!
Steps (continued)
4) This continued instruction set assumes that you have CVSNT installed for basic CVS client operations on the XP workstation. If not, you'll need to adjust your settings where you specify the cvs executable (e.g. c:\program files\cvsnt\cvs.exe might be c:\cygwin\bin\cvs.exe if you're using the cvs client that ships with Cygwin). It also assumes a PuTTY installation. See here for the complete software suite that I used with Netbeans® 4.0.
Since I'm using PuTTY, I will take advantage of the fact that I can store a PuTTY session that has the proper host, username, SSH options, etc. for connecting to the Linux/Un*x host that runs the CVS server. I won't describe this simple process, but will assume that a session has been setup with the name 'cvssession'. I also assume that like my previous example with Cygwin SSH/CVS, you have setup a method to allow cvs/ssh transactions to occur without prompting you for a password every time. I did this with PuTTY by defining a private key with puttygen.exe, and configuring my 'cvssession' to use the private key for authentication. I then added the public key component of that key to my authorized_keys file on the server side.
Finally, once per XP login session I do have to type in the passphrase for that private key, using pageant.exe, to allow PuTTY to cache it for the life of my login. With all these steps, CVS should be able to use PuTTY's command line tool (plink.exe) repeatedly without any further password prompts, which is the way most people want to have things setup. Again, see my previous example page for an example of how to do this with Cygwin SSH .. PuTTY is just a little different.
5) In the IDE, choose
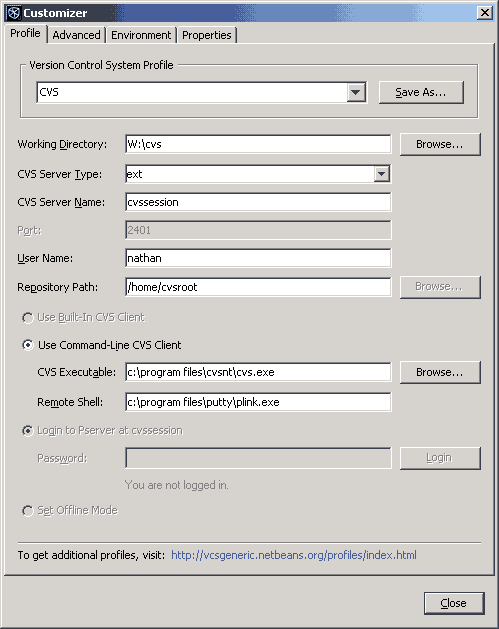
Tools -> Options -> Source Creation and Management -> Generic VCS Profiles -> CVSYou'll need to edit the values of the following Variables:
CVS_SERVER=cvssession
CVS_USERNAME=nathan (if your name is 'Nathan', like mine is ;)
CVS_REPOSITORY=/home/cvsroot (or whatever your CVS server uses locally for $CVSROOT)
CVS_EXE=c:\program files\cvsnt\cvs.exe
6) Then, also in the IDE, select
Versioning -> Versioning ManagerYou'll need to Add the root directory of wherever you keep the CVS files you're working on (this step replaces "mounting" filesystems in previous versions of the IDE). This may be a mapped network drive, or if you use WinCVS to checkout files and create a local XP sandbox, then enter the root folder of that sandbox. I used standard Windows® drive mappings (e.g. W:\cvs), so I'm not sure if UNC paths (e.g. \\server\username\cvs) will work.
Then, in the Profile definition for the working directory you just added, select the CVS Version Control System Profile, the 'ext' server type assuming your CVS server is on another machine, 'cvssession' as the server name (which is the alias for a particular PuTTY session), and the value of CVS_REPOSITORY above for "Repository Path". Then, select "Use Command-Line CVS Client". You will need to enter something like this:
c:\program files\cvsnt\cvs.exe
c:\program files\putty\plink.exe
for the CVS Executable and Remote Shell, respectively.
7) While still in the Versioning Manager dialog for your working directory, choose the Environment tabbed pane. You will need to make sure that an environment variable (either system-wide, or user-level) is defined for:
CVS_RSH=c:\program files\putty\plink.exe
CVS_SSH=c:\program files\putty\plink.exe
and that these environment variables have the "Used in VCS" checkbox selected, so that the IDE can use them properly. If you have to add these environment variables, either in the IDE, or via the XP Control Panel, I'd recommend a logout before expecting the IDE to take advantage of the new settings.
8) Remember that using the PuTTY plink.exe method of ssh'ing (a.k.a. CVS_RSH), you will have to cache your password with the PuTTY authentication agent, pageant.exe, before attempting to use the CVS functions within the IDE. If you don't do this, the background command will essentially be waiting for a passphrase, with you totally unaware of how to supply one. Therefore, the command will hang indefinitely. If you forget to use pageant.exe before starting the IDE, you can go into the Runtime explorer tab in the IDE and find the currently running VCS commands and manually kill them. But, don't forget next time!
Finally, I generally haven't had good success checking things out from within the IDE. I usually will use the cvs command line, or WinCVS to check out a project. Then, once my sandbox is populated, I create a new project (with existing java sources) from the IDE. Good luck!
|
Home |
|
Intro |
|
Services |
|
traffic |
|
Knowledge |
|
blog |
answers
 |
|
howtos (old) |
|
essays (old) |
|
Download |
|
apps |
|
secure
|
|
About |
|
skills |
|
experience |
resume(old) 
|
|
other links |
|
corporate info |
|
Contact |
email keys

|
| Client Access |
Print-Friendly 
|
